Most fleets do not have the capability or bandwidth to conduct exhaustive testing, however, you can still do a valid evaluation and get results that give you confidence in what to expect from selected tire brands.
By Phillip Mosier
We have all been there before and we have all heard it: “You get what you pay for.” In many cases that is true. Yet, when it comes to the tires in your fleet, it may not be the case. With tires you can actually get more than you pay for, and if you do, you are cutting operational costs significantly since tires often represent the second highest expense following fuel.
Tires constantly evolve and applications vary. They are far from a commodity item, and tire price points do not always tell you the “life” you should expect to get from them. Just because you pay more for a tire does not mean you will get higher mileage and more retreads. When it comes to tires, the only way to determine what is best for you is to test them for yourself. That means developing an ongoing tire evaluation program—an extra step that can end up saving you significant dollars. You will be comparing the tires you currently run with a possible newcomer to your fleet.

When we test new tires for our commercial lines1, we benchmark against tier 1 and tier 2 brands. Our evaluations are macro in scale and we run them in multiple fleets. We use the data to see how our tires stack up to the competition.
Unlike a tire company that is testing products day in and day out with a dedicated team of technical professionals and sophisticated equipment, most fleets do not have the capability or bandwidth to conduct exhaustive testing. Yet, you can still do a valid evaluation within a fleet and get results that give you confidence in what to expect from selected tire brands.
Steer Tire Evaluations
To conduct an apples-to-apples comparison, you need to keep all unnecessary variables out of the equation, which may not be easy in waste haul operations. You should run like-brand and like-model waste trucks, and they should be the same age with the same specs. Waste haul vehicle types such as front load or side load have a direct impact on tire performance due to weight and tire load. In addition, drivers comparable in skill level should run the trucks. Drivers can impact tire performance in subtle ways. Routes and loads should be identical, or as similar as possible.
Once proper “like” equipment is identified, you will want to outfit four of the trucks with your new evaluation steer tire, and outfit another four with the steer tire you are currently running. You will be doing a head-to-head analysis. There are two reasons to run at least four vehicles: 1) to get a good average wear rate considering any variation in vehicles, routes or driver, and 2) you lose a tire due to a road hazard, you will still have three vehicles left running.
Drive Tire Evaluations
Drive tires are somewhat easier to evaluate. Instead of pitting vehicles against each other, you can use one vehicle to test two brands of tires. The only caveat is that their diameters need to be within 1⁄4-inch of each other. To put that into perspective, you can run one drive tire with 26/32nds of tread depth and have the competing drive tire within plus or minus 4/32nds of that figure. Any larger variances will cause tire scrubbing and inaccurate results.
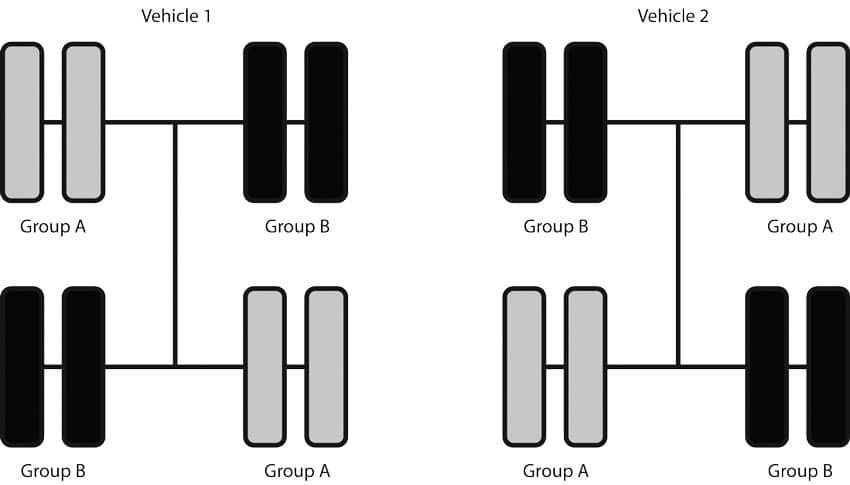
With this evaluation, you can run two trucks with eight-wheel positions. The key is doing an X-pattern (or cross-axle) on the two rear axles. However, do not run the tires identically on the two trucks as different positions tend to have different wear rates. For example, tires on the trailing axle typically wear faster than the forward axle, and there can be side-to-side differences. So, be sure to reverse the X pattern from one evaluation truck to the next truck.
Maintenance Practices
Once tires are mounted, start the evaluation off properly by having each vehicle undergo a total vehicle alignment on the front and rear axles. Once that is done, you should not have to do a re-alignment during the evaluation period unless you detect irregular wear or have a suspension issue with a vehicle.
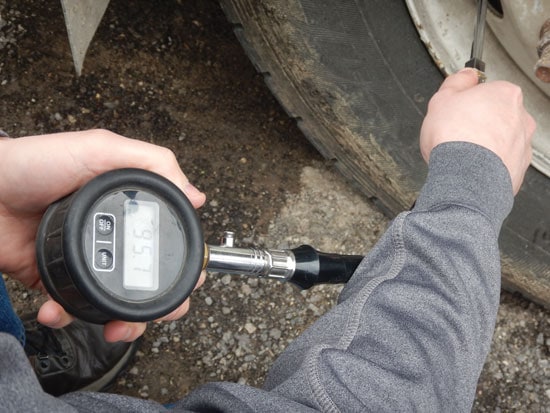
It is important to have the drivers conduct proper pre-and post-trip inspections. That means tire inflation needs to be checked properly—not with a tire thumper. Tires need to be gauged to ensure tire inflation pressure is at the pre-defined level for the specific position. To make it easy on your drivers, install flow-through valve caps, so they do not have to spend time taking off valve caps.
What’s more, drivers must keep their eyes (and fingers) on the tires to inspect for wear—a weekly fingertip diagnostic (simply running a hand over the tread) can detect signs of irregular wear. Should toe or feather wear be found, for example, it could mean an alignment problem, suspension problem, or bent tie rod.
If drivers detect early signs of irregular wear, your fleet can fix the underlying problem and continue with the evaluation. Be sure to keep record of any wear issues and vehicle adjustments.
Evaluation Periods
Evaluation units should be checked at intervals that correspond to about 20 percent of typical tire life. The main item to analyze is tread wear, and for this you need a quality tread depth gauge that measures to 1/32nd or 1mm. Electronic gauges with digital readouts are easiest to read.
When checking the tire, you should have three points for gauging across the tread face—the outside, middle and inside of the tread. Again, a fingertip diagnostic should be conducted and any signs of irregular wear reported. Irregular wear could indicate a problem with the vehicle, as mentioned earlier. If the irregular wear is found to be severe, in the drive position, rotate the tires in cross axle design (for example, LRI & O to RFI & O). However, do not rotate side-to-side.
Since deeper tread squirms, wear rates will be faster at the start of the evaluation when the tread is near full depth, then level out toward the end.
Projecting Tread Wear
After two to three checks, you should have solid wear data on your tires. With this wear data in hand, you can now make projections on how many more miles the tires will last before they are pulled for retreading. This will give you an apples-to-apples mileage comparison and provide the basis for your first cost-per-mile figure on virgin rubber, once you factor in the purchase price.
Now that you have data on how much tread is worn on your tires, how do you make your calculations?
First, calculate tread wear rate in miles per 1/32nd of tread—miles traveled divided by tread consumed. Tread wear rate = (current mileage – installation mileage)/(original tread depth – current tread depth). As an example, the first test truck’s current mileage is 117,000 miles and tires were installed at 100,000 miles. The original tread depth on the steer tires was 24/32nds and the current depth is 10/32nds. So, 14/32nds were worn off. Thus, the wear rate is 17,000 miles divided by 14, or 1,214 miles per 32nd.
Next, calculate projected miles to removal. You will need the original tread depth of the tire and the pull tread depth. For steer positions, a typical pull depth might be 6/32nds, and in our example, the evaluation steer had 24/32nds of tread. Projected total miles to removal = wear rate x (original tread depth – pull point tread depth). In our example: 1,214 x (24-6) = 1,214 x 18 = 21,852 miles.
Provided that your operation is not so severe that you lose many tires to damage, the projections give a good measure of relative performance and a good basis for calculating costs per mile.
Casing and Retreads
With projected mileage in hand, the next step is to understand and get a feel for the tire’s next life—and that is retreading. If time were not a factor, you could run a full-blown evaluation getting true mileage figures on your evaluation tires, plus the number of times the tire could be retreaded. This is cradle-to-grave documentation, which is good to maintain as part of normal operations. However, that could mean years to gain quantifiable data. Instead, we recommend two things:
• First: Look at the warranty on your evaluation tire and compare it against the tire you are currently running. The manufacturer should offer a casing warranty in the event that the tire is not retreadable for certain reasons (but not for damage caused by severe operations). The warranties typically range from four to seven years from the date of manufacture and offer casing credits ranging from about $40 to $130 on the first retread. Most manufacturers also offer a reduced casing credit for the second retread. This warranty comparison should give you a feel for how well the manufacturers back their products.
• Second: Talk with your tire dealer or retreader and ask about retreadability of the evaluation tires compared to your current tires. The retreader may give you actual rejection rates for the two brands (also known as RAR or “returned as received”) but be sure the information relates to operations similar to yours. Also, ask them what they will pay for a virgin casing of each brand.
Your tire dealer may also be able to refer you to other fleets that are running the tires you are considering. You could ask them what they are experiencing in retreadability.
Determining Cost-Per-Mile
You have your data, now you can crunch some numbers. The original tire cost-per-mile is a simple calculation. Take the purchase price of your evaluation tire and divide by your projected mileage. As an example, you may be paying $400 for your evaluation steer tire and your projected mileage is 21,852 miles. So, divide your cost by the mileage and you come up with $0.0183 per mile (or $18.30 per 1,000 miles). If your current tire costs $600, and it projected to deliver 10 percent more mileage or 24,037 miles, you would be at $0.02496 per mile (or $24.96 per 1,000 miles). So, even if your evaluation tire did not outperform the incumbent tire in mileage, it did best it in cost-per- mile, and that is the metric that is most important.

If you expect to sell the casing and not retread it for your own use, then there is another step in the calculation to account for the casing re-sale. (And this example assumes that 100 percent of casings are retreadable.) Take your purchase price and subtract the retread casing re-sale value to determine the net cost of the tire, then divide the result by your mileage. For example, if you paid $400 for the tire and expect to sell the casing for $40, your net cost would be $360. If you received 21,852 miles on that steer tire, your cost-per-mile of tread would be $0.01647 (or $16.47 per 1,000 miles).
After the Evaluation
If your evaluation tire outperformed the incumbent, as in our example above, do you make a wholesale change in up-fitting your equipment? Our recommendation is to move forward to confirm your findings, but not all the way forward. If you have followed through properly, you have completed a very important evaluation, which now gives you confidence in the new tire and how it should outperform the incumbent. It will not take long to see the proof on a grander scale. So, begin to purchase 50 percent of the “new” tires for six months—both in replacement and through your truck OE if available—and then at a year, move forward on full-scale standardization. | WA
Phillip Mosier is Manager of Commercial Tire Development for Cooper Tire & Rubber Company. (Findlay, OH) A 20-year tire professional, he is responsible for the design and development of commercial truck and bus tires for the North and South America regions. Phillip and his team have brought to market many successful commercial truck tires in the Cooper Commercial Series and Roadmaster brand tire lines. He can be reached at [email protected].
Note
1.Cooper Tire & Rubber Company; Cooper and Roadmaster brand.